3 Ways to Make Natural Easter Egg Dye
Dyeing Easter eggs is one of the most fun things I remember doing for holidays with my family. I loved designing the colors in stripes, getting fancy with the color arrangement, maybe adding some stickers or permanent marker drawings for some extra pizzazz.
So, imagine my disappointment when I learned that artificial food coloring is so bad for our health that it has been linked to behavioral, attention, and sleep problems in children, as well as an increased risk of getting cancer and other health issues in everyone. Happy Easter, y’all…
But there is a way to have your naturally colored cake and eat it too (without suffering from any of these ridiculous, unchecked health issues). It turns out natural foods make edible dyes! Beets, blueberries, turmeric, red cabbage, onion skins, elderberry powder…the possibilities are endless! The first two methods take quite a bit longer to color than the chemically-filled dye, but the third option is just as efficient!
NATURAL EASTER EGG DYE FROM SCRATCH
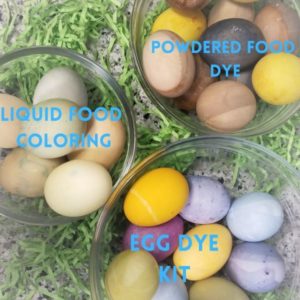
I made my own dye using a few different powdered foods–beet root, acai berry, elderberry, and turmeric. I boiled 2 cups of water, added and stirred in 2 tablespoons of each powder (in individual containers, not in one 2-cup water pot), and 1 tablespoon of vinegar. I let these eggs sit overnight in the fridge to absorb as much color as it could!
NATURAL EASTER EGG DYE FROM FOOD COLORING
I boiled 1/4 cup of water per color used, added 1 teaspoon of vinegar and 10-20 drops of this natural food coloring, depending on the shade of color I wanted. I found that I did get results more quickly than using the dye from scratch, but it did still take a few hours to see a distinct coloration. The coloring shown in the picture took
NATURAL EASTER EGG DYE FOR PURCHASE
This version was far and away the quickest and produced the brightest colors. I used this store-bought natural egg dye kit from Color Kitchen, and it did not disappoint. It took at most 15 minutes for the eggs to dye to the color you see in the picture, so this is definitely the method I would use if I’m coloring eggs with little ones!
Disclaimer: For the colors in the picture, I did not follow the instructions to dye one color at a time (I.e. getting green by dipping in blue first, then yellow). I mixed the powders before adding the liquid so the liquid color was green, purple, etc.
FUN WAYS TO ADD DESIGNS TO YOUR EGGS
- Use a white crayon before you dye the eggs to make designs on them
- Place a rubber band around the egg before dyeing it to create a negative space design (You can also create negative space with leaves and putting them in nylon to keep the leaf in place)
- Add stickers
If you love the idea of coloring things naturally, check out this article about how to make your own colored sugar for baking decorations!
Here is a round-up of products mentioned in the article for your shopping convenience!
- Acai Berry Powder
- Beet Root Powder
- Elderberry Powder
- Natural Egg Dye Kit
- Natural Liquid Food Coloring
- Turmeric Powder
You can click the buttons below to go back to the Spring Seasonal articles, or you can venture back to our other Seasonal articles, DIY Seasonal recipes or the Seasonal supplies and products we love!
Disclaimer: All information contained herein is intended for educational purposes only. It is not provided to diagnose, prevent, or treat any disease, illness, or injured condition for any human or animal, and Mother Nature’s Truths, as well as the author(s), contributor(s), publishers, and owners accept no responsibility for such use. Anyone suffering from any disease, illness, or injury, or who has an animal suffering from such, should consult with their physician or veterinarian. The statements herein have not been evaluated by the Food and Drug Administration.