DIY recipes for healing

“To heal is to touch with love that which we previously touched with fear.”
– Stephen Levine
Below are some of our favorite recipes that we use when our bodies need a little extra healing support. We hope you’ll find them effective for yourself and your family too!
Click here to jump to our Healing articles.
Click here to jump to our Healing products.
This page contains affiliate links. Click here to read our affiliate policy.
About
The recipe below is an easy way to make your own elderberry syrup. If you want to buy pre-made syrup, check out our Immune Support products page for the brands we love!
Want to learn more about elderberry syrup and why it’s so amazing? Click here to read our article about it!
Ingredients
Note: If possible, use organic ingredients.
- 3 1/2 cups filtered water
- 2/3 cup dried elderberries (or 1 1/3 cup fresh or frozen)
- 2 tablespoons grated ginger (or 1 teaspoon dried ginger)
- 1 tsp cinnamon (or 1 whole stick)
- 1/2 tsp ground cloves (or 2-3 whole cloves)
- 1 cup raw honey (added after cooking and cooling)
Directions
- Put the water, elderberries, ginger, cinnamon, and cloves in a saucepan. (Do NOT put in honey. When heated, honey’s enzymes, minerals and nutrients are either weakened or destroyed, having no healing qualities any more.)
- Bring to a boil, then reduce to a simmer and cover for 45 minutes to an hour, until the liquid has reduced by almost half.
- Remove from heat and leave it to cool until it can be handled.
- Mash the berries carefully.
- Pour through a strainer into a glass bowl or jar.
- Discard the elderberries and let cool until lukewarm.
- When it is no longer hot, add the honey.
- Once the honey is sufficiently mixed in, store in a mason jar in the fridge.
-
About
You can use this oil-based herbal treatment topically to treat bumps, bruises, wounds, and skin irritations (depending on the herb you are using). The commonly used oils include olive, grapeseed, almond, jojoba, and coconut. Making a salve is a two-step process, involving making both a salve and an herbal oil infusion. Scroll down to the next recipe for directions on how to finish making your salve, or click here.
Make sure that any container and herb being used is sufficiently dried and sterilized to avoid mold or bacterial growth.
Materials
- 1 1/2 cup carrier oil (olive, jojoba, etc.)
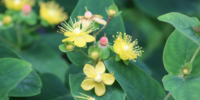
- 1/2-1 cup dried herbs (select herbs based on what your body needs. Click here to check out our guide to help you decide which herbs to use!)
- Canning jar or amber bottle
- Fine mesh strainer or cheesecloth
- Tincture bottle
- Double boiler (or saucepan and heatproof bowl)
Directions
Warm-Infused Method
- Place dry herbs in container and cover with oil.
- Using a dry, sterilized utensil, push down the herbs to make sure that there are no air pockets or bubbles.
- Roll the jar around in your hands to finish mixing the herb and oil.
- Store in a warm, dark place for 4-6 weeks, shaking or stirring the mixture every few days.
- Once infused, strain the herbs from the oil using the cheesecloth.
- Pour the infused oil into a clean dry eye-dropper (tincture) container.
- Label and store in a cool, dark place.
Fast, Double-Boiler Infusion Method
- Place a stainless steel saucepan on the stove filled 1/4 with water, and bring to a boil.
- Put herbs into another dry, sterilized stainless steel bowl that fits on the saucepan, sitting above the water.
- Simmer for 30-60 minutes. (Make sure that the boiling water does not get into the oil infusion and that the water level does not get too low. If the level drops, carefully add water to reach 1/4 full again.) The temperature should be between 120-140 degrees Fahrenheit.
- Once infused, strain the herbs from the oil using the cheesecloth.
- Pour the infused oil into a clean dry eye-dropper (tincture) container.
- Label and store in a cool, dark place.
About
A liniment is an herb-infused topical liquid that absorbs quickly into the skin. This is most often used for sore muscles, joints, and stiffness. Liniments are traditionally made using rubbing alcohol because of its extraction effectiveness and the quick penetration and evaporation off the skin.
Materials
- Solvent of your choice (rubbing alcohol, vodka, witch hazel, or vinegar)
- Fresh or dried herbs (select herbs based on the healing your body needs. Click here to check out our guide to help you decide which herbs to use!). If using fresh herbs, chop before placing in jar.
- Canning jar
- Fine mesh strainer or cheesecloth
- Amber bottle
- Optional: Menthol crystals and/or essential oils
Directions
- Place herbs in a dry, sterilized jar.
- Cover the herbs completely with chosen solvent (rubbing alcohol, vodka, etc.)
- Keep the jar in a warm place for 4-6 weeks, shaking it daily.
- After 4-6 weeks, strain the liquid from the herbs with the strainer or cheesecloth.
- If you are adding menthol crystals, add now. They will be dissolved in the alcohol.
- Pour the liniment into a dark amber bottle.
- Label with the name and date. Note: Liniments are for external use only.
About
I have made this and used this, and it is AMAZING! My husband got a cut on his hand and, I kid you not, he said the pain went away almost instantaneously and it healed within 2-3 days. I also use this any time I have any kind of issue with my skin, and I’m all about it. And how great is it that every single ingredient is found in nature? I mean, so much joy over here!
Ingredients
- 1/2 cup extra virgin olive oil
- 1/2 cup coconut oil
- 1/3 cup dried lavender
- 1/3 cup dried calendula
- 4 tbsp beeswax pellets
- 1 tbsp honey (optional)
- 10 drops tea tree essential oil
- 5 drops lavender essential oil
- Cheesecloth or coffee filters
Directions
- Over low heat in a double boiler, combine the coconut oil and olive oil until melted. If you don’t have a double boiler, you can use a large glass or metal bowl set over a pot of boiling water.
- Keeping the heat on low, add the dried lavender and calendula and allow the herbs to infuse for 30 minutes.
- Prepare a small bowl with a coffee filter or cheesecloth, and pour the mixture through the filter to strain out the herbs, letting the infused oil drip into the bowl below.
- Return the infused oil to the double boiler (be sure to clean out any remaining dried herbs). Over low heat, add the beeswax, stirring until melted. Take off from heat and allow to cool slightly.
- Add the honey (if using) and the essential oils. Combine.
- Pour the mixture into one large jar or two small jars. The mixture will begin to solidify. If you’re using honey, stir every minute or two, otherwise the honey will settle at the bottom of the jar. The mixture takes about 5-10 minutes to fully set. Once set, it’s ready to use and will keep for 12 months at room temperature.
About
A salve is an oil-based herbal treatment that is used topically to treat bumps, bruises, wounds, and skin irritations (depending on the herb you are using). The commonly used oils include: olive, grapeseed, almond, jojoba, and coconut. Making a salve is a two-step process, involving making both a salve and an herbal oil infusion.
Make sure that any container and herb being used is sufficiently dried and sterilized to avoid mold or bacterial growth.
Making a salve can be a difficult process at first, but you can do it! And once you find the exact measurements and materials that work for you, you will have the knowledge and resourcefulness to make whatever concoction you need to heal. No pharmacy required!
Materials
- 1 cup herb-infused oil (click to jump to instructions to make herb-infused oil)
- 1 ounce beeswax pellets
- Salve jar
- Double boiler (or saucepan and heatproof bowl)
- Fine mesh strainer or cheesecloth
The beeswax is very difficult to clean. I recommend having a separate heatproof bowl and metal stirring utensil dedicated exclusively to your herbal preparations.
Directions
- Place the herb-infused oil into a double boiler.
- Fill the saucepan with water 1/4 of the way and keep on low to gently heat the oil.
- Add the beeswax and stir until gently melted.
- Remove the mixture from heat and pour into salve jar.
- Allow to cool to room temperature, reaching a semi-solid state before using.
About
Essential oils can be amazing when you’re congested and want to clear it up quickly (and pamper yourself a little bit in the process!). However, you should take care when using essential oils with steam inhalation, as they can damage the respiratory tract if used improperly. Remember that the essential oil will disappear as vapor very quickly so you will need to add 1-2 drops more of each essential oil when the oil vapor is gone. Do not add too much essential oil. Add sparingly.
Materials
- 4-6 quart pot
- Stove
- Table
- Towel or blanket
- Pot holder
- Essential oil of your choice (peppermint and wintergreen are both great options)
Directions
- Pour 2-4 quarts of water into the pot.
- Bring the water to a boil.
- Take the water off the heat.
- Prepare an area at a table where the head can be positioned above the pot without getting burnt by the pot.
- Place the hot pot on the table, using a potholder to protect the table.
- Drape a blanket over the head and pot, creating a vapor cocoon.
- Sit over the pot with the head directly over the pot of hot water and inside the blanket cocoon.
- Add 1-2 drops of essential oil to the pot.
- Breathe in the vapors. Keep your eyes closed so they don’t get irritated.
NOTE: If the vapor cocoon gets too hot or intense:
- Remove head from under the blanket.
- Rest a moment.
- Return when ready.
About
Herbs are a fantastic way to support your immune system and help your body when you’re congested. Any herb with volatile, antimicrobial essential oils, or herb capable of opening the nasal passages can be used in a steam inhalation for respiratory congestion. Usually an herb that contains menthol is used as menthol is key to opening up the nose and sinuses. The opening of the passageway via a steam inhalation is due to both the steam of the water and the menthol in the herb. Two herbs with menthol that are easy to find and inexpensive are peppermint and wintergreen. The menthol in these herbs is what gives it that refreshing brisk coolness to our mouth with ingestion or when applied on our skin. In addition to herbs with menthol, I also use a strong antimicrobial/anti-fungal herb to be added to the water such as thyme, or oregano.
Peppermint, oregano and thyme are generally easy to procure if you don’t already have them growing outside your door.
Materials
- 4-6 quart pot
- Stove
- Table
- Towel or blanket
- Pot holder
- Fresh or dried herbs
Directions
- Pour 2-4 quarts of water into the pot.
- Bring the water to a boil.
- Take the water off the heat.
- Prepare an area at a table where the head can be positioned above the pot without getting burnt by the pot.
- Place the hot pot on the table, using a potholder to protect the table.
- Drape a blanket over the head and pot, creating a vapor cocoon.
- Sit over the pot with the head directly over the pot of hot water and inside the blanket cocoon.
- Add 1-2 drops of essential oil to the pot.
- Breathe in the vapors. Keep your eyes closed so they don’t get irritated.
NOTE: If the vapor cocoon gets too hot or intense:
- Remove head from under the blanket.
- Rest a moment.
- Return when ready.
About
A syrup is taken orally and it made from water extraction. Syrups have a longer shelf-life than simple water extracts because they are sweetened with a form of sugar (typically honey), which acts as a preserve. I like to use honey because of its natural healing qualities, including being antimicrobial, antiseptic, full of antioxidants, and a cough suppressant. You should most definitely make this for your little ones or those of us who don’t enjoy the bitter taste of some helpful herbs!
Ingredients
- 4 cups water
- 1/2 cup to 1 cup dried herbs
- 1-2 cups sugar (either raw sugar, maple syrup, or honey–if using honey, add after the concoction has come to lukewarm temperature)
Makes 1 pint (16 ounces) of syrup
Directions
- Add the herbs and sugar (not honey, if using) to water and boil, then reduce to simmer.
- Leave to simmer for 25-45 minutes–until the water has reduced by half.
- Allow to come to lukewarm temperature and strain the herbs from the water.
- (If using honey as the sweetener, add now and stir.)
- Store in a jar in the refrigerator for up to a month (will keep up to 3 months in the freezer).
About
A tincture is an herbal extract made from alcohol, vegetable glycerin, distilled water, or apple cider vinegar that is taken orally, though it can also be used topically. More of an herb’s medicinal properties are extracted when alcohol is used, but it is up to you and your family to choose what works best for you.
Make sure that any container and herb being used is sufficiently dried and sterilized to avoid mold or bacterial growth.
Materials
- Canning jar or amber bottle
- 3 1/2 cups dried herbs or 1 3/4 cups fresh herbs (select herbs based on what your body needs. Click here to check out our guide to help you decide which herbs to use!)
- Vodka, vegetable glycerin, or apple cider vinegar (enough to cover the top of the herbs)
- Fine mesh strainer or cheesecloth
Directions
- Put herbs in jar or bottle and pour enough liquid to cover the herb.
- Seal and store in a cool dark place for two weeks.
- Shake occasionally.
- Strain the contents through a cloth, wringing out all the liquid.
- Bottle and label with the name of the contents and the date made.
Disclaimer: All information contained herein is intended for educational purposes only. It is not provided to diagnose, prevent, or treat any disease, illness, or injured condition for any human or animal, and Mother Nature’s Truths, as well as the author(s), contributor(s), publishers, and owners accept no responsibility for such use. Anyone suffering from any disease, illness, or injury, or who has an animal suffering from such, should consult with their physician or veterinarian. The statements herein have not been evaluated by the Food and Drug Administration.